How to Mount a Rack to a Bike With No Eyelets
20+ years testing gear in Colorado backcountry
How to Mount a Rack Without Eyelets: The Ranked Answer
Mount it to the axle first. An axle-mount rack that replaces your thru-axle or quick-release skewer is the strongest option on a frame with no eyelets. After that, in order: a strap-and-cradle rack triangulated off the seat tube and seatstays, a seatpost rack, then P-clamps. One rule overrides all of it — never clamp carbon.
That ranking is not about convenience or price. It is about where the load goes. A rack bolted to rated eyelets loads mounting points the frame designer drew, sized and signed off on. A rack clamped to a tube loads friction, and friction is a load path nobody engineered on your behalf.
Eyelets are the real gate on most decisions about bikepacking racks and panniers, which is why this question gets asked so often and answered so badly. Most "universal" mounting kits are universal in exactly one sense: they will physically attach to almost anything, which is not the same as being safe on it. The clamp holding your rack is only as good as the tube it is squeezing — and on a loaded bike over washboard, the failure is rarely a slow sag you notice. It is sudden, and it happens near a spinning wheel.
So this is a safety article in how-to clothes: the options below are ranked by load path, and two of them end in no.
First, Check Whether You Really Have No Eyelets
Plenty of riders who think they have a bare frame have provision they have not found. Look in four places.
The dropout and the seatstay. Threaded bosses hide under paint, under stickers, and on the inboard face of the dropout where you will not see them without turning the bike over. Old Man Mountain's primer on eyelets describes the usual convention: where a frame has two sets near the dropout, the upper is intended for a rack and the lower for a fender.
The brake bridge. A single hole up there is almost always a fender mount. The same guide makes the point that one eyelet near the tyre at the bridge is a fender provision — and that the other holes on such a frame probably are too.
Thru-axle provision. You may not need frame eyelets at all. If your rear hub runs a 12 mm thru-axle, your bike already has the mount described in the next section.
The fork. Three-pack bosses, lowrider eyelets and mid-blade mounts are common now, and they turn a mounting question into a balance question — see front racks and low-riders for which fork provision carries what.
Most conventional rear racks assume four threaded points and nothing else; our notes on the best rear racks for bikepacking separate those from racks that bring their own mounting.
Strongest Load Path: Axle-Mount Racks
An axle-mount rack clamps nothing. A fit kit replaces your thru-axle or quick-release skewer with one carrying threaded bosses, and the rack bolts to those. The load goes into the axle, through the dropouts, into the frame — the path that already carries you every time you sit down.
Old Man Mountain's Elkhorn is the category example, and its listed specifications are specific enough to quote: a load capacity of 25 lb (11.34 kg) in 6061 aluminium, at around 623 g for the short version with extenders, per retailer spec listings. Old Man Mountain describes its Fit Kits as a low, captured mounting point at the axle and states they are safe for carbon, steel, titanium and aluminium bikes and forks. That is the strongest way to carry a rack load on a carbon bike that a maker will actually stand behind.
Two honest limits. The rack still needs an upper attachment, usually a strap or clamp to the seatstay, so check what it is allowed to touch. And thread pitch and axle length are not negotiable: the wrong fit kit feels fine in the stand and wrong under load.
Failure mode: a mismatched or under-torqued axle — not survivable at speed, which is why you follow the axle maker's documentation to the letter.
Universal means it will attach to anything. It does not mean anything should be attached to it.
Strap-and-Cradle Racks: The No-Tools Middle Ground
The AEROE Spider style of rack is the interesting arrival of recent years. Instead of bolts it braces off the seatstays on rubber-coated adapters held by tensioned straps, and per AEROE's spec page it has zero attachment to the seat post. Per the Spider rear rack's listing: four tear-proof straps, a stated load capacity of 16 kg, and 641 g bare.
Now read the other number, this one on AEROE's own spec page: 8 kg on carbon bikes. The maker halves its own rating when the tube being squeezed is carbon. That is not marketing caution — it is a maker telling you what the clamping interface will and will not do, and the clearest evidence here that clamped carbon is a different structural problem from clamped metal.
Failure mode: strap creep and rotation rather than fracture. Straps relax as they take a set, and a cradle rotated ten degrees puts your dry bag nearer the tyre than you left it. That is recoverable if you check it — this category loosens before it lets go, which P-clamps do not.
Seatpost Racks: A Cantilever, Rated Like One
A seatpost rack clamps the post and carries everything on an unsupported arm behind the saddle: the easiest mount here and the least comfortable structurally, because every kilogram is multiplied by its distance from the clamp.
Published ratings reflect that. Retail listings for Topeak's Beam seatpost racks state a 20 lb limit, and a comparable convertible rack, the TransIt, lists 22 lb (10 kg) — so treat roughly 9 kg as the ceiling. That TransIt listing also instructs owners not to attach the rack to carbon or titanium seatposts, and Topeak's own MTX BeamRack manual states the rack is not suitable or intended for use with carbon fibre seatposts.
Three further constraints: a dropper post rules this out entirely; a short exposed post may not give the clamp enough purchase; and because the load sits high and behind the axle, this is the worst of these options for handling. The yaw on a fast loose descent is mass doing what a lever does.
Failure mode: clamp slip under braking, or fatigue at the post. Neither announces itself politely.
P-Clamps: Last Resort, Metal Only
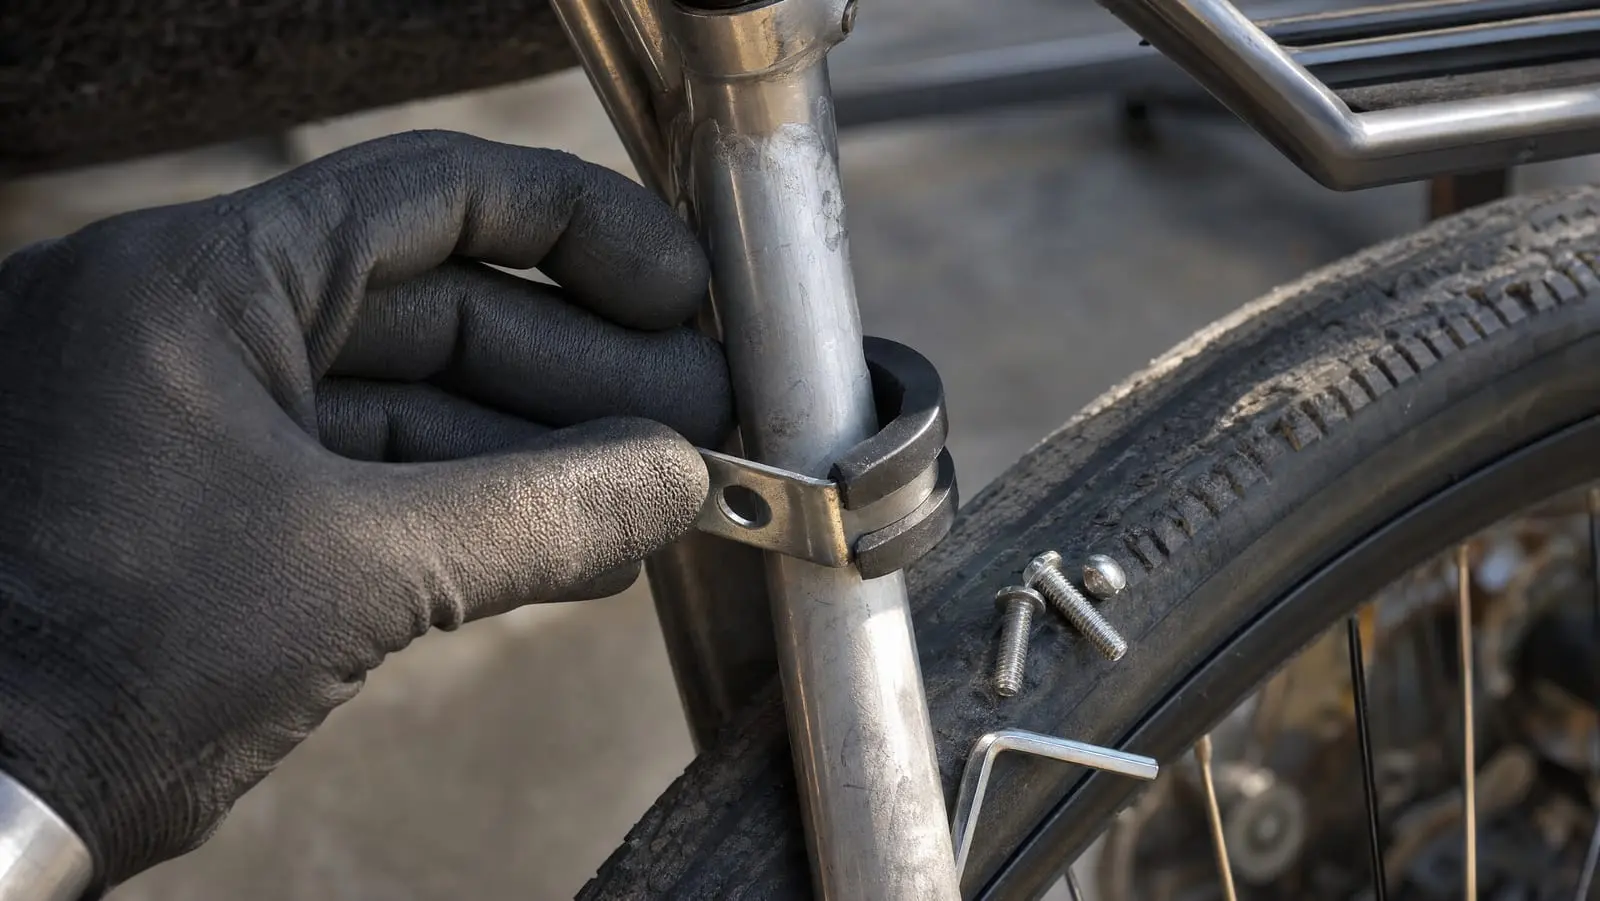
P-clamps (P-clips, in British usage) wrap a tube and present a tab with a hole in it. Oldest trick in touring, and it works within limits nobody sells them with.
If you use them: steel or aluminium only, the widest clamp that fits, and a shim between clamp and tube. Riders in touring forum discussions commonly describe wrapping old inner tube around the stay first, to protect paint and stop the clamp creeping under vibration. Those same discussions make the structural point plainly: riders use P-clips to steady a rack at the top, and warn against trusting them with the load down at the dropouts. Hand them the vertical load and you are trusting friction between a thin steel band and a painted tube.
No P-clamp is sold with a bicycle luggage rating, and the rack it holds was rated with a different mount. If you cannot name the figure your mount is rated to, you do not have a rated mount — you have a hope.
Failure mode: slip, then shear. Usually under braking, usually loaded, usually without warning, because a clamp that has crept 5 mm looks identical to one that has not.
The Honest Non-Rack Answers
Two options outrank an improvised mount on load path.
A trailer. A cargo trailer hitches at the rear axle and needs no frame provision. Burley's Flatbed, per its listed specifications, is rated for loads up to 100 lb at a trailer weight of 14.5 lb — four times the capacity of the strongest rack above, on a mount your frame already has. You pay in 6.5 kg of dead weight and a vehicle that is miserable on singletrack.
Soft bags. A frame bag, seat pack and bar roll need no eyelets, no clamps and no rating argument. The tradeoff is capacity and access speed, which we lay out in bikepacking bags vs panniers; on a fork with three-pack bosses, fork cages recover much of the volume a front rack would have given you. If your bike is carbon and eyelet-free, this is the answer, and it is not a consolation prize.
Carbon: The Section Where the Answer Is No
Clamping a carbon tube to carry a load is the one case here where we would not do it.
The industry's own hardware says so. Per retailer listings, Tubus's clamp set for seatstay mounting is not suitable for carbon frames, with a further warning not to overload the frame; and the Tubus LM-1 set, which exists specifically to get a lowrider onto a fork without eyelets, cannot be used on carbon forks, with cracking the fork given as the stated risk. Park Tool's guidance on its internal seat tube clamp generalises it: clamping directly onto carbon fibre and other ultra-thin materials can cause inadvertent frame damage — which is why a tool exists to hold a frame without squeezing a tube.
Torque is not the whole story, and that is where riders talk themselves into trouble. A torque figure controls how hard the fastener pulls; the damage depends on clamp width, how well the clamp radius matches the tube, whether the wall is thin at that spot, and how many thousand vibration cycles the joint sees. Aluminium dents and warns you. Carbon does not advertise; it cracks. And a loaded rack adds cyclic bending and twisting the layup was never asked about.
Doing the Install So It Survives the First Hour of Washboard
Hardware choice is most of this, but a good mount installed badly fails like a bad one. Clean the tube, inspect it for dents, chips and cracks, and never clamp over a flaw. Put a rubber shim or a strip of old inner tube between metal and paint, to spread pressure and stop the clamp abrading to bare tube, where corrosion starts on steel. Use a medium-strength thread locker on every rack bolt, not the permanent grade; vibration backs fasteners out whether you believe in it or not.
On torque, the rule is restraint: use the lower of the two published figures — your rack's documentation and the clamp or component maker's spec — and read the rack's instructions first, because rack bolts and frame clamps are not one spec. We will not print a number; the only one that matters is in your hardware's paperwork. If neither party publishes one, reconsider the mount. The companion piece on rack weight limits and bolt torque covers why rated capacities and fastener specs travel together.
Then test it where failure costs nothing. Load the rack to the weight you intend to carry, ride a slow lap of a car park, stand on the pedals, brake hard, and roll off a kerb twice. Check every bolt and strap, then again after the first hour on real ground — that is when clamps take their set.
Downgrade the Number You Were Planning to Carry
An improvised mount deserves a reduced load, and the rack's rating is not your target.
Start from the lower of the two numbers — the rack's stated capacity and the mount's, if it has one — then take a margin off, because the load path is improvised. AEROE halving its Spider rating for carbon is a fair model for what a maker thinks a weaker interface is worth. On an unrated P-clamp install we would treat roughly 9 kg as the ceiling for the whole rig. Arrangement matters as much as mass: dense items low and forward of the rear axle, nothing heavy cantilevered off the back of the deck. Our guide to weight distribution when packing covers that; the rack weight limits piece covers the numbers.
Remember what a rating assumes. EN 14872:2006, the European standard for bicycle luggage carriers — which standards bodies list as superseded by EN ISO 11243 — covers carriers intended for permanent mounting above or adjacent to the wheels, per its published scope. A capacity tested on a permanently mounted carrier was tested with a mounting in mind. Change the mounting and you have changed the test.
What We Would Actually Do
If your frame takes a thru-axle, buy an axle-mount rack with a fit kit matched to your exact axle standard. If it does not, a strap-and-cradle rack on metal tubes is the next most trustworthy thing, with the maker's rating treated as a limit rather than a goal. A seatpost rack is fine for an overnighter under 9 kg. P-clamps are a steel-frame workaround, loaded light and checked daily.
And if the bike is carbon and eyelet-free, the money is better spent on soft bags than on hardware that voids your frame warranty for 8 kg of carrying capacity. That is the sentence we would want said to us before the order went in.
Where that leaves you in the wider system — which rack, which bags, whether a rack at all — is the subject of our guide to choosing a rack and pannier setup. Decide the mount first; everything after that is shopping.